Measuring correctly is very important before installing stainless steel staircase railings. Sound measurements help avoid poor fitting with proper emphases on safety and aesthetic value. Here is a guide to measuring correctly for your stainless-steel staircase railings. Use these steps to measure precisely and make it easier while installation is done.
Understanding the Basics of Staircase Railings
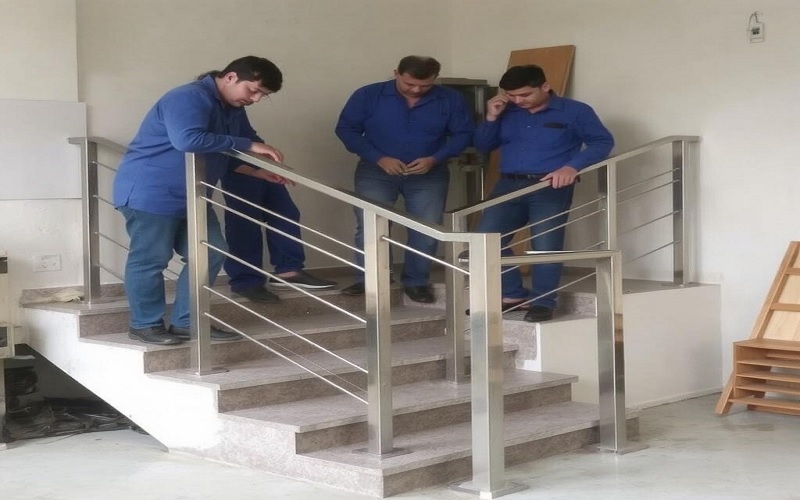
Before measurements can be taken, I should know the basic parts of staircase railings. Usually, such railings comprise posts, handrails, and infill panels. The posts are usually the ones that support the handrails and hold the structure firmly while the handrail is designed to give a safe grip on its use. Between the posts are infill panels which ensure safety. Understanding these parts helps in taking an accurate measurement.
Tools Required for Measuring
Ensure you get all the tools beforehand. This is to avoid missing out on some things you need. There is the measuring tape, level, pencil, and notepad. If you’re working with long distances, you might use a helper to ensure he holds the measuring tape. With all the tools around, the process will surely be smooth. Ensure your measuring tape is flexible and easy to read. This way, you can be assured it will indeed produce accurate measurements.
Step 1: Measure the Height of the Railings
Measure the height of the railings. This usually is between 34 to 38 inches. To do this, find the position of the rail starts which usually happens at the top of the stairs. Then take down that with measuring tape to the height you wish to mark and mark this point very legibly with your pencil. You are to repeat this process at several points along the staircase for consistency.
Step 2: Measure the Length of the Staircase
Now measure the length of the staircase. Reach up from bottom step to top along that measurement. That is the total length of the tread and riser. Remember to measure with the angle of the staircase, not straight up. That is going to be the most accurate measurement you will make for the railing. Write that down for reference later.
Step 3: Determine the Angle of the Staircase
Angle of the stair basically calls for a measurement. You can opt for either a level or a protractor. You place the level next to the staircase and then twist it to be level, and from the surface, you take an angle with the protractor, and you record this angle since you will apply it while designing your railing to fit exactly inside the staircase.
Step 4: Measure the Posts
Measure the location and height of the posts. Posts are normally at the same height as the railing. Measure the distance between each post location along the staircase. The spacing should not be more than 4 feet apart for safety purposes. Mark the positions clearly in your notepad. These marks will guide the installation later.
Step 5: Measure for the Handrail
Now measure the handrail. Measure from one end of the stairs, along the path of the handrail. Note and draw the angle if measured down the stairs. Measure its length and be aware that it may curve at both ends as it is dependent on your design. Draw a rough plan to take these curves into account when recording the measurements.
Step 6: Measure for Infill Panels
Take measurements for the infill panels. Infill panels typically go between the posts and under the handrail. Their height would then be measured from the bottom of the hand rail up to the top of the tread, and their width between the posts. Ensure your infill panels fit comfortably inside these measurements. Important in the preservation of both safety and aesthetics.
Step 7: Check for Obstructions
Look inside the staircase for anything that may be blocking their installation. Examples of this are lights, walls, and any architectural elements. Take extra measurements so you will not run into complications when you install them. A clear path for the railings means fewer things to fix later on. Note down these obstacles on your paper so you will remember them when you get down to installing.
Step 8: Double-Check Your Measurements
Record all the measurements, and double-check each one. Review your notes and make sure that each measurement is in the appropriate position. Often, a second check by someone else will find the mistakes. This will help you save time and energy when installing. It helps you get the appropriate materials for your stainless-steel staircase railings.
Step 9: Consult with a Professional
You can always consult a professional if your measurements seem not to be right. A stainless steel staircase railing manufacturer could be of great help for you in this matter. He would be able to check the measurements and give you some tips about the required materials. Even the cost that might be incurred during the installation process will also be prevented by consulting a professional. This is an important step which saves time, and so it allows the perfect fit.
Conclusion
Measuring for stainless steel staircase railings requires much attention. But with the following steps, such measures shall always be accurate and successful. Always remember the right tools to use, the components that comprise it, and double checking. DIY people or from a professional standpoint, precise measurement will guarantee this in order to enhance safety and beauty in the given staircase. Having taken and written down these measures, you are now good to go and place your order and install your stainless-steel railings with full confidence.

Luxurious Urban Set of 3 Urli Bowl tealight Holder Stand Diwali Home puja Decor Traditional Indian Brass Decorative Bowl for Home | Ideal for Floating Flowers (Taj Stand Set), (Gold-3)
₹339.00 (as of 22 October, 2024 18:23 GMT +05:30 - More infoProduct prices and availability are accurate as of the date/time indicated and are subject to change. Any price and availability information displayed on [relevant Amazon Site(s), as applicable] at the time of purchase will apply to the purchase of this product.)
One94Store 12 meters - ConvertLong LED Power Pixel Serial String Light, 360 Degree LED Bulb Light Series Copper Led Pixel String Light for Home Diwali, Christmas Decoration (Multicolor, Pack of 1)
₹99.00 (as of 22 October, 2024 18:22 GMT +05:30 - More infoProduct prices and availability are accurate as of the date/time indicated and are subject to change. Any price and availability information displayed on [relevant Amazon Site(s), as applicable] at the time of purchase will apply to the purchase of this product.)
ATTRO Ultra Pro 2 Motivational 2-Liter BPA-Free Water Bottle with Leak-Proof Flip-Top Cap, Nylon Strap and Stylish Mint Green Color for Daily Hydration
₹119.00 (as of 22 October, 2024 18:23 GMT +05:30 - More infoProduct prices and availability are accurate as of the date/time indicated and are subject to change. Any price and availability information displayed on [relevant Amazon Site(s), as applicable] at the time of purchase will apply to the purchase of this product.)
Diwali Diya Decoration Floating Rose Flower Candle in Bulk | 12Pcs, Smokeless, Dripless & Long Lasting Candle | Water lamp Candles for Home, Pool, Weddings, Deepawali Decor, Cafe & Spa
₹151.00 (as of 22 October, 2024 18:23 GMT +05:30 - More infoProduct prices and availability are accurate as of the date/time indicated and are subject to change. Any price and availability information displayed on [relevant Amazon Site(s), as applicable] at the time of purchase will apply to the purchase of this product.)
CraftVatika 12 Rangoli Colour Powder Tube Kit, Diwali Decoration Items Bottles Tool Floor Art Rang for Home Navratri Pongal Pooja Mandir Decor (Pack of 12) (1 Box- 12 Bottle)
₹199.00 (as of 22 October, 2024 18:22 GMT +05:30 - More infoProduct prices and availability are accurate as of the date/time indicated and are subject to change. Any price and availability information displayed on [relevant Amazon Site(s), as applicable] at the time of purchase will apply to the purchase of this product.)Discover more from The General Post
Subscribe to get the latest posts sent to your email.