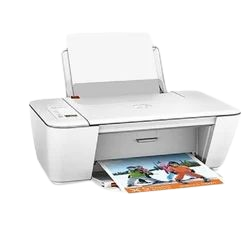
The HP OfficeJet 4650 is an all-in-one printer designed for home and small office use, offering printing, scanning, copying, and faxing capabilities. It provides wireless printing options, making it a versatile tool for your day-to-day printing needs. hp officejet 4650 setup is straightforward, whether you’re using it with a Windows PC, Mac, or a mobile device. This article provides a step-by-step guide to setting up your printer, ensuring you’re ready to use it efficiently.
Unboxing and Basic Setup
Before diving into the wireless and software setup, you’ll need to complete the physical setup of your HP OfficeJet 4650. Follow these steps:
- Unbox the Printer:
- Open the box and carefully remove the printer and all its accessories. Ensure you have everything, including the power cable, ink cartridges, user manuals, and installation CD.
- Remove Protective Materials:
- Remove any protective tapes and packaging materials from the outside and inside of the printer. This step is crucial to ensure that all the printer parts move freely during operation.
- Connect the Power Cable:
- Plug the power cable into the back of the printer and connect the other end to a power outlet. Press the power button to turn on the printer.
- Install the Ink Cartridges:
- Open the ink cartridge access door located at the front of the printer. The carriage will move to the center. Unwrap the black and color ink cartridges provided in the box, remove the protective tape, and insert them into their respective slots. Push them in until they click into place.
- Load Paper:
- Open the paper tray at the bottom of the printer, adjust the guides, and load a stack of plain paper. Ensure that the paper is aligned correctly and pushed in securely.
- Align the Printer:
- After installing the ink cartridges and loading paper, the printer will prompt you to align the cartridges. Follow the on-screen instructions to print an alignment page. Once printed, scan the alignment page as directed to complete the process.
Wireless Network Setup
The HP OfficeJet 4650 offers wireless printing, which allows you to print from any device connected to the same network. Here’s how to connect the printer to your Wi-Fi network:
Method 1: Wireless Setup Wizard
- Access the Control Panel:
- On the printer’s touch screen, tap the Wireless icon or go to the Setup menu. Select Wireless Settings and then Wireless Setup Wizard.
- Select Your Network:
- The printer will search for available wireless networks. Select your network from the list of detected networks.
- Enter Your Wi-Fi Password:
- Use the touch screen to enter your network’s password. Make sure to input the password correctly, as it is case-sensitive.
- Confirm Connection:
- Once the printer successfully connects to the network, the Wireless light will turn solid. The printer will also display a confirmation message on the screen.
Method 2: WPS (Wi-Fi Protected Setup) for Compatible Routers
If your router supports WPS, you can connect the printer using this method:
- Initiate WPS on the Printer:
- On the printer’s touch screen, navigate to Wireless Settings and select Wi-Fi Protected Setup. Press the WPS button on your router when prompted.
- Wait for Connection:
- The printer will automatically connect to the network. Once connected, the Wireless light will become solid.
Software Installation
After connecting your HP OfficeJet 4650 to the Wi-Fi network, the next step is to install the necessary software and drivers on your computer or mobile device. The installation process differs slightly depending on whether you’re using a Windows PC, Mac, or mobile device.
For Windows Users
- Download the Software:
- Visit the official HP website and search for the HP OfficeJet 4650 printer. Download the latest drivers and software package for Windows.
- Run the Installer:
- Open the downloaded file and follow the on-screen instructions to install the software. During the installation, you’ll be prompted to choose a connection type. Select Wireless.
- Complete the Setup:
- The software will detect the printer on your Wi-Fi network. Follow the prompts to complete the installation, and you’ll be ready to print, scan, and copy wirelessly from your Windows PC.
Mac Users
- Download the Software:
- Go to the HP website, locate the HP OfficeJet 4650, and download the drivers and software package for macOS.
- Install the Software:
- Open the installer file and follow the on-screen instructions. Select Wireless as the connection method when prompted.
- Complete Installation:
- The software will automatically detect the printer on the network. Once the installation is complete, you’ll be able to print and scan from your Mac wirelessly.
For Mobile Devices
If you plan to print directly from a smartphone or tablet, the HP Smart App is the easiest way to manage your HP OfficeJet 4650:
- Download the HP Smart App:
- Available on both the App Store and Google Play, the HP Smart App allows you to set up and manage your printer from your mobile device.
- Add the Printer:
- Open the HP Smart App, tap the plus sign (+) to add a new printer, and follow the on-screen instructions. The app will detect the printer on your Wi-Fi network.
- Complete the Setup:
- After adding the printer, you can print, scan, and monitor ink levels directly from your mobile device.
Connecting to a Computer via USB
If you prefer a wired connection, you can connect the HP OfficeJet 4650 to your computer via USB. Follow these steps:
- Connect the USB Cable:
- Plug one end of the USB cable into the printer and the other end into your computer.
- Download the Software:
- Download the necessary drivers and software from the HP website.
- Install the Software:
- Run the installation file and follow the on-screen instructions. Choose USB as the connection type when prompted.
- Complete Setup:
- Once the installation is complete, the printer will be ready to use.
Fax Setup
The HP OfficeJet 4650 also includes fax capabilities. To set up faxing, follow these steps:
- Connect the Phone Line:
- Plug one end of the phone cable into the Line port on the back of the printer and the other end into a phone jack.
- Configure Fax Settings:
- On the printer’s control panel, tap the Fax icon and follow the on-screen instructions to configure your fax settings, including entering your fax number and setting up preferences.
- Test the Fax:
- Send a test fax to ensure everything is working correctly. HP provides a test fax service that you can use to verify your setup.
Troubleshooting Common Issues
Even with the easy setup process, you may encounter some issues when setting up the HP OfficeJet 4650. Here are some common problems and their solutions:
1. Printer Not Connecting to Wi-Fi
- Solution: Ensure that the printer is within range of the Wi-Fi router. Restart the printer and router, and try connecting again. Double-check that the Wi-Fi password is entered correctly.
2. Printer Not Detected by Computer
- Solution: Make sure that both the printer and the computer are connected to the same Wi-Fi network. Restart both devices and try reinstalling the printer software.
3. Paper Jams
- Solution: Turn off the printer and carefully remove any jammed paper. Ensure that the paper is loaded correctly in the tray and that the paper guides are adjusted properly.
4. Print Quality Issues
- Solution: If the print quality is poor, check the ink levels in the cartridges. If necessary, clean the printhead using the printer’s maintenance options found in the control panel.
Advanced Features
The HP OfficeJet 4650 offers several advanced features that can enhance your printing experience:
1. Mobile Printing
With the HP Smart App, you can print from your mobile device no matter where you are. The app also allows you to scan documents using your device’s camera and send them to the printer.
2. ePrint
HP ePrint is another useful feature that allows you to print by sending an email directly to your printer. Once set up, your printer will have a unique email address, and you can print documents by emailing them to this address.
3. Automatic Document Feeder (ADF)
The HP OfficeJet 4650 comes with an Automatic Document Feeder, which is useful for scanning or copying multiple pages at once without manually placing each page on the scanner bed.
Conclusion
Setting up the HP OfficeJet 4650 is a straightforward process that can be done in a few simple steps. Whether you’re connecting wirelessly, using a USB connection, or setting up fax capabilities, this guide has you covered. By following the instructions, you’ll have your printer up and running in no time, ready to handle all your printing, scanning, copying, and faxing needs.
From unboxing to configuring advanced features like mobile printing and faxing, this all-in-one printer offers everything you need for an efficient and productive home or small office environment. With a successful setup, you’ll be well-equipped to tackle any task that comes your way.

eCraftIndia Valentine Gift for Girlfriend Boyfriend| Purple Resin Miniature Cute Couple Statue Girl on Boy's Shoulder Decorative Showpiece Valentine Day Gift for Husband Wife|Valentine Decoration Item
₹277.00 (as of 6 February, 2025 11:29 GMT +05:30 - More infoProduct prices and availability are accurate as of the date/time indicated and are subject to change. Any price and availability information displayed on [relevant Amazon Site(s), as applicable] at the time of purchase will apply to the purchase of this product.)
EZILO Air Fryer Silicone Tray | Multipurpose Silicone Tray for Air Fryer with Liner, Basket, Bowl | Airfryer Accessories Items for Baking and Frying | 8 inch, Pack of 2
₹250.00 (as of 6 February, 2025 11:32 GMT +05:30 - More infoProduct prices and availability are accurate as of the date/time indicated and are subject to change. Any price and availability information displayed on [relevant Amazon Site(s), as applicable] at the time of purchase will apply to the purchase of this product.)
EZILO Dish Drying mat for Kitchen Water Absorbent mat Drying mat for Kitchen Utensils Large Dry mat for Kitchen Utensils Drying mat Water Absorbent mats for Kitchen Items | 30 x 40 Cm
₹250.00 (as of 6 February, 2025 11:32 GMT +05:30 - More infoProduct prices and availability are accurate as of the date/time indicated and are subject to change. Any price and availability information displayed on [relevant Amazon Site(s), as applicable] at the time of purchase will apply to the purchase of this product.)
LIVORO Study Table/Bed Table/Foldable and Portable Wooden/Writing Desk for Office/Home/School (C-BIDDINGS BLACKK)
₹399.00 (as of 6 February, 2025 11:32 GMT +05:30 - More infoProduct prices and availability are accurate as of the date/time indicated and are subject to change. Any price and availability information displayed on [relevant Amazon Site(s), as applicable] at the time of purchase will apply to the purchase of this product.)
Pigeon by Stovekraft Amaze Plus Electric Kettle (14289) with Stainless Steel Body, 1.5 litre, used for boiling Water, making tea and coffee, instant noodles, soup etc. (Silver)
₹549.00 (as of 6 February, 2025 11:29 GMT +05:30 - More infoProduct prices and availability are accurate as of the date/time indicated and are subject to change. Any price and availability information displayed on [relevant Amazon Site(s), as applicable] at the time of purchase will apply to the purchase of this product.)Discover more from The General Post
Subscribe to get the latest posts sent to your email.